The CAPTCHA approach to securing forms is not new – it first appeared in the late 90′s for domain name submissions to search engines and the like – but with the exponential growth of scripted exploits it’s coming to the fore once again. The main targets are Guestbook and Contact forms, but any online form can be a target for abuse.
The code presented here shows you how to create a simple CAPTCHA graphic with random lines and digits and how to incorporate it into an HTML form to prevent automated submission by malicious scripts.
1. Creating a CAPTCHA graphic using PHP
The following code needs to be saved as a stand-alone PHP file (we call it captcha.php). This file creates a PNG image containing a series of five digits. It also stores these digits in a session variable so that other scripts can know what the correct code is and validate that it’s been entered correctly.
<?PHP // Adapted for The Art of Web: http://www.the-art-of-web.com // Please acknowledge use of this code by including this header. // initialise image with dimensions of 120 x 30 pixels $image = @imagecreatetruecolor(120, 30) or die("Cannot Initialize new GD image stream"); // set background to white and allocate drawing colours $background = imagecolorallocate($image, 0xFF, 0xFF, 0xFF); imagefill($image, 0, 0, $background); $linecolor = imagecolorallocate($image, 0xCC, 0xCC, 0xCC); $textcolor = imagecolorallocate($image, 0x33, 0x33, 0x33); // draw random lines on canvas for($i=0; $i < 6; $i++) { imagesetthickness($image, rand(1,3)); imageline($image, 0, rand(0,30), 120, rand(0,30), $linecolor); } session_start(); // add random digits to canvas $digit = ''; for($x = 15; $x <= 95; $x += 20) { $digit .= ($num = rand(0, 9)); imagechar($image, rand(3, 5), $x, rand(2, 14), $num, $textcolor); } // record digits in session variable $_SESSION['digit'] = $digit; // display image and clean up header('Content-type: image/png'); imagepng($image); imagedestroy($image); ?>
The output of this script appears as follows (reload to see it change):
![CAPTCHA]()
This image is meant to be difficult for ‘robots’ to read, but simple for humans (the Turing test). You can make it more difficult for them by addition of colours or textures, or by using different fonts and a bit of rotation.
We’ve simplified the script presented above as much as possible so that you can easily customise it for your site and add more complexity as necessary. Further down the page you can find examples that use colours, rotation and different fonts, but the basic concept is the same.
2. Adding a CAPTCHA to your forms
In your HTML form you need to make sure that the CAPTCHA image is displayed and that there’s an input field for people to enter the CAPTCHA code for validation. Here’s a ‘skeleton’ of how the HTML code for your form might appear:
<form method="POST" action="form-handler" onsubmit="return checkForm(this);"> ... <p><img src="/captcha.php" width="120" height="30" border="1" alt="CAPTCHA"></p> <p><input type="text" size="6" maxlength="5" name="captcha" value=""><br> <small>copy the digits from the image into this box</small></p> ... </form>
If you’re using JavaScript form validation then you can test that a code has been entered in the CAPTCHA input box before the form is submitted. This will confirm that exactly five digits have been entered, but not say anything about whether they’re the right digits as that information is only available on the server-side ($_SESSION) data.
So again, here’s a skeleton of how your JavaScript form validation script might appear:
<script type="text/javascript"> function checkForm(form) { ... if(!form.captcha.value.match(/^\d{5}$/)) { alert('Please enter the CAPTCHA digits in the box provided'); form.captcha.focus(); return false; } ... return true; } </script>
Finally, in the server-side script that is the target of the form, you need to check that the code entered in the form by the user matches the session variable set by the captcha.php script:
<?PHP if($_POST && all required variables are present) { ... session_start(); if($_POST['captcha'] != $_SESSION['digit']) die("Sorry, the CAPTCHA code entered was incorrect!"); session_destroy(); ... } ?>
It’s important to call session_start() both in the captcha.php script (when seting the session variable) and in the server-side validation script (in order to retrieve the value) as those files are processed independently and can’t otherwise share information. We call session_destroy() only after the form submission has been verified.
You can see this code working in the Feedback form below.
3. Putting it all together
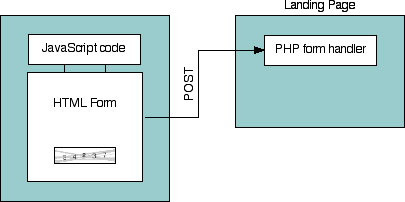
There has been feedback sent by a number of people confused about which code to put where to get this working on their own website. To make it clearer I’ve put together a couple of diagrams which illustrate the two most common solutions.
Here you can see illustrated the simplest and most common setup, but by no means the best solution. The form is checked using JavaScript and then POSTed to another page/script where the data is processed:
![]()
A more ‘professional’ solution involves a practice called Post/Redirect/Get (PRG) which means that the data is first processed and then the user is redirected to a landing page:
![]()
This avoids a number of issues including problems caused when someone reloads the landing page which in the first configuration would cause all the POST data to be re-submitted.
This can also be implemented using three scripts where the form handler has it’s own file and decides whether to redirect back to the FORM or forward to the landing page depending on whether the data validates.
In any case the PHP form handler code needs to appear as the first item before any HTML code is generated.
4. Upgrading the CAPTCHA to block new bots
The CAPTCHA image presented above was ‘cracked’ after a matter of months by one or two bots. Fortunately a few small changes to the code can send them packing at least for a while.
Here’s some code to ‘jazz up’ our CAPTCHA to give it a better chance of being bot-proof. The sections of code that have been changed are highlighted:
<?PHP // Adapted for The Art of Web: http://www.the-art-of-web.com // Please acknowledge use of this code by including this header. // initialise image with dimensions of 120 x 30 pixels $image = @imagecreatetruecolor(120, 30) or die("Cannot Initialize new GD image stream"); // set background and allocate drawing colours $background = imagecolorallocate($image, 0x66, 0x99, 0x66); imagefill($image, 0, 0, $background); $linecolor = imagecolorallocate($image, 0x99, 0xCC, 0x99); $textcolor1 = imagecolorallocate($image, 0x00, 0x00, 0x00); $textcolor2 = imagecolorallocate($image, 0xFF, 0xFF, 0xFF); // draw random lines on canvas for($i=0; $i < 6; $i++) { imagesetthickness($image, rand(1,3)); imageline($image, 0, rand(0,30), 120, rand(0,30) , $linecolor); } session_start(); // add random digits to canvas using random black/white colour $digit = ''; for($x = 15; $x <= 95; $x += 20) { $textcolor = (rand() % 2) ? $textcolor1 : $textcolor2; $digit .= ($num = rand(0, 9)); imagechar($image, rand(3, 5), $x, rand(2, 14), $num, $textcolor); } // record digits in session variable $_SESSION['digit'] = $digit; // display image and clean up header('Content-type: image/png'); imagepng($image); imagedestroy($image); ?>
And here is the modified CAPTCHA graphic produced by the new code:
![CAPTCHA]()
All we’ve done here is changed the background colour from white to green, the lines from grey to light green and the font colour from black to a mixture of white and black.
This method has now also been cracked by a small number of bots. In recent days we’ve seen 10-20 succesful exploits a day, but we’re not going to give up. Read on for details of a more advanced CAPTCHA.
For information on how the CAPTCHA images can be cracked, read this article.
5. Yet another CAPTCHA
Here’s the next version that we’ve been using until recently. The main change from those presented above is that we now use a larger range of fonts to confuse the spambots. You can find a good resource for GDF fonts under References below. Unfortunately GDF fonts are now hard to come by, but there are alternatives using TrueType (TTF) fonts. The positioning of the lines has also changed to make them more random.
<?PHP // Adapted for The Art of Web: http://www.the-art-of-web.com // Please acknowledge use of this code by including this header. // initialise image with dimensions of 120 x 30 pixels $image = @imagecreatetruecolor(120, 30) or die("Cannot Initialize new GD image stream"); // set background and allocate drawing colours $background = imagecolorallocate($image, 0x66, 0xCC, 0xFF); imagefill($image, 0, 0, $background); $linecolor = imagecolorallocate($image, 0x33, 0x99, 0xCC); $textcolor1 = imagecolorallocate($image, 0x00, 0x00, 0x00); $textcolor2 = imagecolorallocate($image, 0xFF, 0xFF, 0xFF); // draw random lines on canvas for($i=0; $i < 8; $i++) { imagesetthickness($image, rand(1,3)); imageline($image, rand(0,120), 0, rand(0,120), 30 , $linecolor); } // using a mixture of system and GDF fonts $fonts = array(3,4,5); $fonts[] = imageloadfont('$fontdir/bmcorrode.gdf'); $fonts[] = imageloadfont('$fontdir/bmreceipt.gdf'); $fonts[] = imageloadfont('$fontdir/checkbook.gdf'); shuffle($fonts); session_start(); // add random digits to canvas using random black/white colour $digit = ''; for($x = 15; $x <= 95; $x += 20) { $textcolor = (rand() % 2) ? $textcolor1 : $textcolor2; $digit .= ($num = rand(0, 9)); imagechar($image, array_pop($fonts), $x, rand(2, 14), $num, $textcolor); } // record digits in session variable $_SESSION['digit'] = $digit; // display image and clean up header('Content-type: image/png'); imagepng($image); imagedestroy($image); ?>
And here’s the result – a little less readable perhaps for humans, but a lot less readable for robots who were starting to get around the previous version:
![CAPTCHA]()
If you have trouble locating GDF fonts you can also use imagettftext in place of imageloadfont/imagechar which lets you use TTF fonts instead of architecture dependent GD fonts. This is demonstrated in the following section. There are also tools for converting TTF fonts into GD format.
6. A more readable CAPTCHA using TTF fonts
As you can see we’ve upgraded our CAPTCHA image once again. Mainly to make it more human-friendly with larger characters. The new version is similar to the above, but uses a (free) TTF font and some rotation. The background hasn’t changed.
<?PHP // Adapted for The Art of Web: http://www.the-art-of-web.com // Please acknowledge use of this code by including this header. // initialise image with dimensions of 160 x 45 pixels $image = @imagecreatetruecolor(160, 45) or die("Cannot Initialize new GD image stream"); // set background and allocate drawing colours $background = imagecolorallocate($image, 0x66, 0xCC, 0xFF); imagefill($image, 0, 0, $background); $linecolor = imagecolorallocate($image, 0x33, 0x99, 0xCC); $textcolor1 = imagecolorallocate($image, 0x00, 0x00, 0x00); $textcolor2 = imagecolorallocate($image, 0xFF, 0xFF, 0xFF); // draw random lines on canvas for($i=0; $i < 8; $i++) { imagesetthickness($image, rand(1,3)); imageline($image, rand(0,160), 0, rand(0,160), 45, $linecolor); } session_start(); // using a mixture of TTF fonts $fonts = array(); $fonts[] = "ttf-dejavu/DejaVuSerif-Bold.ttf"; $fonts[] = "ttf-dejavu/DejaVuSans-Bold.ttf"; $fonts[] = "ttf-dejavu/DejaVuSansMono-Bold.ttf"; // add random digits to canvas using random black/white colour $digit = ''; for($x = 10; $x <= 130; $x += 30) { $textcolor = (rand() % 2) ? $textcolor1 : $textcolor2; $digit .= ($num = rand(0, 9)); imagettftext($image, 20, rand(-30,30), $x, rand(20, 42), $textcolor, $fonts[array_rand($fonts)], $num); } // record digits in session variable $_SESSION['digit'] = $digit; // display image and clean up header('Content-type: image/png'); imagepng($image); imagedestroy($image); ?>
And here you can see the output of the above script. The TTF fonts used in this example come from the (free) ttf-dejavu-core package on Debian, but there are thousand of Truetype fonts to choose from, many of them free. Typefaces where the characters have gaps or a bit of flair will work better against spambots, but remember it also has to be human-readable.
![CAPTCHA]()
The imagettftext function is quite simple to use in this situation:
imagettftext($image, $fontsize, $angle, $xpos, $ypos, $color, $fontfile, $text);
We’re using a font size of 20 pixels and a rotation ($angle) of between -30 and +30 degrees for each digit. The characters are 30 pixels apart ($xpos) and have a random vertical offset – enough just to touch the top or bottom of the canvas as that makes it tougher for a robot to decipher.
So how long will we need to keep using CAPTCHAs to protect forms? Unfortunately, until Microsoft invents a secure operating system and puts an end to botnets we need to keep evolving our security to stay ahead of the spammers. For small websites something like the above example will work fine. For more popular sites there are any kind of protective measures, but that’s another story.
7. Usability improvements
It’s the little things that make your visitors more relaxed about filling in forms. The code below has been modified to limit the input to only numbers using the onkeyup event, and adding an option to reload/refresh the CAPTCHA image in the case that it’s not readable. .... <p><img id="captcha" src="/captcha.php" width="160" height="45" border="1" alt="CAPTCHA"> <small><a href="#" onclick=" document.getElementById('captcha').src = '/captcha.php?' + Math.random(); document.getElementById('captcha_code').value = ''; return false; ">refresh</a></small></p> <p><input id="captcha_code" type="text" name="captcha" size="6" maxlength="5" onkeyup="this.value = this.value.replace(/[^\d]+/g, '');"> <small>copy the digits from the image into this box</small></p> ...
In your form, the CAPTCHA section will then appear something like the following:
Security Check ![CAPTCHA]() refresh CAPTCHA* <- copy the digits from the image into this box
refresh CAPTCHA* <- copy the digits from the image into this box
You can see this code in action in the Feedback form at the bottom of the page, using the latest CAPTCHA.
![]()
![]()


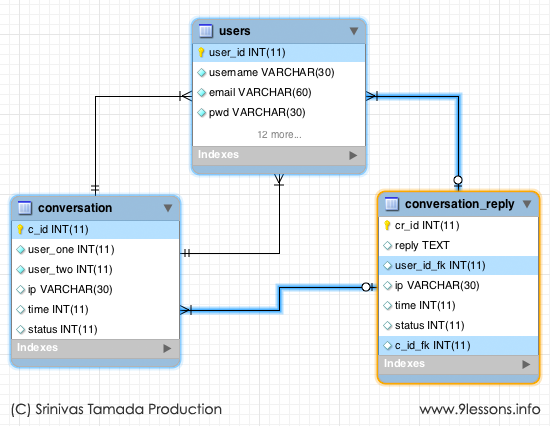
 Pada
Pada 


 Live Demo